Server:Server Status

CSS-Only Rounded, Shadowed, Transparent Corners

I've been super frustrated on a web project I've been on where I've wanted CSS-only (no slow-ass JSON solutions) rounded corners with transparent backgrounds and and drop shadows. I originally tried a 3 image solution with transparent backgrounds, but it didn't work well and the middle image showed up behind the top and bottom images. I tried just making the backgrounds of the png's match the css background, and I discovered the OSX Safari png gamma correction bug. I hate GIF's and JPEG's as much as I can avoid them, so I decided to just rewrite the solution from scratch, which isn't that hard.


The real reason I am writing this is because 90% of the time I want to do something online I just search for code to do something and use the first result as a template. It took me like 30 tries and I still found nothing decent, so I decided to just do it myself from scratch, and maybe someone else can use it.


This is a 9 image solution made in 3 horizontal sections: a header, a center block, and a footer. Yea, it's a ton of nested divs, but it validates, uses no overlap, works on all browsershots I have tested, and can be used with very small pngs. First of all, here's a sample of the result. Here's the images, their titles, and their dimensions, all of which can be modified:

  • Top Left Corner, 15px x 15px, tlc.png tlc
  • Top Border, 1px x 15px, tb.png tb
  • Top Right Corner, 15px x 15px, trc.png trc
  • Left Border, 15px x 1px, l.png l
  • Center, 1px x 1px, c.png c
  • Right Border, 15px x 1px, r.png r
  • Bottom Left Corner, 15px x 15px, blc.png blc
  • Bottom Border, 1px x 15px, bb.png bb
  • Bottom Right Corner, 15px x 15px, brc.png brc

The html for this box is as follows:

<!DOCTYPE html PUBLIC "-//W3C//DTD XHTML 1.0 Strict//EN" "http://www.w3.org/TR/xhtml1/DTD/xhtml1-strict.dtd">
<html xmlns="http://www.w3.org/1999/xhtml" xml:lang="en" lang="en">
 <head>
  <link rel="stylesheet" href="style.css" type="text/css" media="screen" title="no title" charset="utf-8"/>
 </head>
 <body>
  <div id="box">
   <div id="tlc"><div id="trc"><div id="tb"></div></div></div>
   <div id="lb"><div id="rb"><div id="c">
    <p>Holy Crap, content galore!</p>
   </div></div></div>
   <div id="blc"><div id="brc"><div id="bb"></div></div></div>
  </div>
 </body>
</html>

View the CSS for this technique here. Here's how this all breaks down in the box:


Breakdown

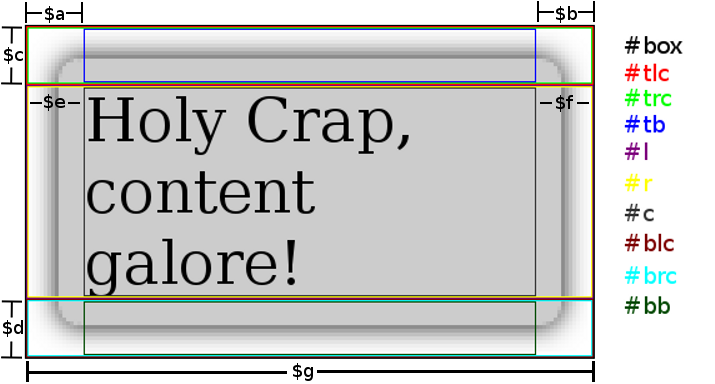
Here's the css required to make this happen, using the variables in the above image:

#box {
  text-align: left;
  position: relative;
  margin: 0 auto;
  padding: 0;
  width: $g;
}
#box #c {
  background: transparent url('c.png') repeat center center;
  margin: 0 $e 0 $f;
}
#box #tlc {
  height: $c;
  background: transparent url('tlc.png') no-repeat top left;
}
#box #trc {
  height: $c;
  background: transparent url('trc.png') no-repeat top right;
}
#box #blc {
  height: $d;
  background: transparent url('blc.png') no-repeat bottom left;
}
#box #brc {
  height: $d;
  background: transparent url('brc.png') no-repeat bottom right;
}
#box #tb {
  height: $c;
  margin: 0 $a 0 $b;
  background: transparent url('tb.png') repeat-x top center;
}
#box #bb {
  height: $d;
  margin: 0 $a 0 $b;
  background: transparent url('bb.png') repeat-x bottom center;
}
#box #rb {
  background: transparent url('r.png') repeat-y center right;
}
#box #lb {
  background: transparent url('l.png') repeat-y center left;
}
p {
  margin: 0 auto;
  padding: 0;
}

It should be very flexible; if you need to you can make the borders bigger or smaller, you can even use different widths for the bottom corners if you must. I thought about toying with another master-div that was on a higher z-index plane so your content could dip into the header/footer, but I decided against it because I don't have time. I hope this is useful, it shouldn't be so complicated but there were no decent guides online.

- - - - - - - - - - - - - - - - - - - - - - - - - - - - - - - - - - - - - - - - - - - - - - - - - - - - - - - - - - - - - - - - - - - - - - - - - - - - - - - - - - - - - - - - - - - - - - - - - - - - - - - - - - - -

The Gum Wrapper Foil Ball

I'm a strange guy and I know this. I often do a lot of weird things for some reasonable goal, for example, fixing the Big Screen TV. Nevertheless, I do a lot of things for no purpose as well, and the best example is the gum wrapper foil ball. I don't really remember how I started, I do know it was my second year of undergrad sometime and that I had one and lost it before working on this second one. I started it by acquiring about 50 de-waxed wrappers and rolling them into a ball, meaning what you see is gum wrapper foil all the way to the core. I like to work on these when watching movies and stuff, just some mindless activity to keep my hands busy which seems to destress me.
Gumball 01
This is the current state of the ball, with a nail clipper for a size comparison. It's a little bigger than a raquetball, maybe a little smaller then a tennis ball. It weighs a couple of pounds.
Gumball 02
Here's the ball with an un-processed wrapper, once again for size comparison.
Gumball 03
I have a process for removing the wax paper from the foil and leaving the foil as a full sheet, which I will now document. Here's a wrapper.
Gumball 04
Flatten the wrapper out.
Gumball 05
Pinch the end with the foil side in.
Gumball 06
Roll the wrapper between your fingers for its entire length.
Gumball 07
When you're done, it should still be bent. The rolling causes the wax to curl slower than the foil, seaprating them.
Gumball 08
Now the ends should begin coming apart. Find any separation and begin to make it bigger with your finger.
Gumball 09
I then slide my finger in which makes the separation bigger.
Gumball 10
More separation.
Gumball 11
Finally pulling the two layers together, the foil has some tacky glue on it still.
Gumball 12
Here's the wrapper, separated.
Gumball 13
Put the wrapper on the ball, glue side down.
Gumball 14
Fold the wrapper around the ball.
Gumball 15
More. . .
Gumball 16
Finally, the wrapper is down, though not smooth.
Gumball 17
I take the ball and roll it against a smooth table, pushing down. It compresses the foil and makes the surface smooth and shiny.
Gumball 18
Come by my room and see it sometime, it's kind of amazing to look at and hold!

- - - - - - - - - - - - - - - - - - - - - - - - - - - - - - - - - - - - - - - - - - - - - - - - - - - - - - - - - - - - - - - - - - - - - - - - - - - - - - - - - - - - - - - - - - - - - - - - - - - - - - - - - - - -

Gum Wrapper Foil Ball

  So, I have a strange habit of making a gum wrapper foil ball, I have now documented it here. It's one of the more interesting things I've ever done.

- - - - - - - - - - - - - - - - - - - - - - - - - - - - - - - - - - - - - - - - - - - - - - - - - - - - - - - - - - - - - - - - - - - - - - - - - - - - - - - - - - - - - - - - - - - - - - - - - - - - - - - - - - - -

The Big Screen TV

I have achieved the greatest feat of my project life. A family had a big screen tv, a 1997 Hitachi, and their house got hit by lightning. They got the tv appraised to be fixed for 500 bucks, so they just got it replaced with a plasma. They put the old one on craigslist, and I picked it up and proceeded to repair it. I actually only spent 50 cents on replacement fuses. The feeling of achievement is awesome, I know that not even my biggest supporters believed I could do it; people recognize I have lots of talent and experience but still think I'm an amateur. A tv must be far too complicated. Well, I figured it out and now it works so BOO YA.

TV Image 1
This is the TV so you can see it, it's 52 inches and all put back together.
TV Image 2
Here you can see us playing Wii on it. The yellow bar on the top is a normal progressive scan, take a photo of any big screen tv or tube tv and you'll see something similar. Like how we have 2 huge TV's right next to each other, one for games and one for tv.
TV Image 3
This is a diagram from the service manual which explains the diagnostic LED system, I had to understand about 60 pages of this.
TV Image 4
Here, you can see the 2 main fuses, both fine. S901 is a relay switch for the power, it's ok. T901 is the transformer, it gets warm. Also, I901 is the mystery part all of my functional diagnosis flow charts point to, so for a while I thought that was the problem.
TV Image 5
Here's what was strange. The protect LED was on, but leading to this circuit is F903, a fuse, which is circled on the left. I've never seen a fuse like this, how do I know if it's blown? It has no continuity across it, so I think that's it, and I'm gonna replace it with a socket and real fuse as my next step.
TV Image 6
More pics of the board, I had to replace those 2 fuses and that did the trick. Hardly a 500 dollar fix, wouldn't you say?
TV Image 7
This is another view of the board, as a reference. It's the whole power circuit.

- - - - - - - - - - - - - - - - - - - - - - - - - - - - - - - - - - - - - - - - - - - - - - - - - - - - - - - - - - - - - - - - - - - - - - - - - - - - - - - - - - - - - - - - - - - - - - - - - - - - - - - - - - - -

New Car and New Apartment

  The civic died in Orlando and I pawned it off ona mechanic for the cost it took me to tow it from the side of the road the 50 miles. We caught a rental car back here to Tallahassee and I proceeded my search for a new car. After investigating several new SUV's and Vans and seeing just how tight I can squeeze my money belt, I found a 1995 Nissan Altima. It's in awesome condition, a guy in town left for grad school at UC Berkeley and couldn't take it anymore, he lived with his dad who is a professor here for the entire duration he had the car and the 2 of them shared it, so they made sure it worked well and had all it's maintenance. It is 11 years old, but it's in nicer shape than the civic was when I lost it. It had some paint scrapes, minor body wear, a few things on the inside needed some help, but with some minor mechanic power of my own I've made it very good. For a total of $2500 after tax, title, registration and a bunch of extras I have a nice new car.
  I also left the shit hole that was the exchange, to finally move into an apartment that's not a maintenance nightmare. But more on that later.

Blairstons 01
Here's the front of the new car. The front bumper has a bunch of crap caked onto it so I haven't fixed the paint yet. I'm gonna get it washed, then paint it, wash it again myself, then get the whole thing waxed.
Blairstons 02
When I got the car, it didn't have hubcaps, so a quick $40 fix and they're better. The stickers on the windshield won't come off, I haven't tried chemicals yet but that's not a big crisis. Notice where I fixed the paint on the side? Of course not 🙂
Blairstons 03
Other side of the car.
Blairstons 04
Back of the car, notice retractable antenna, the little hidden key slot behind the Nissan logo, and my new plate. There was some back bumper damage but it's almost invisible after the paint fix.
Blairstons 05
The trunk open.
Blairstons 06
The back seat doesn't fold down, but it has this neat little trap door for 2x4's, and for people in the back seat to sneak snacks in the trunk.
Blairstons 07
The inside of the drivers seat, the wire you see hanging is my ipod connection. Notice my floormats, my steering wheel cover, and my skull shift knob.
Blairstons 08
THe back seat, it's weird having 4 doors, when I go grocery shopping I have options for where to store things, and I can cart people around.
Blairstons 09
The passenger seat from the driver seat. Like the luxury wood finish?
Blairstons 10
Here's the center console, you can see there's cup holders in the glove box, and there's 2 more in the console, plus an ash tray and my stereo I installed. Also see the skull!
Blairstons 11
Ok, so I know it's silly, but his eyes light up red when you hit the button on the left, which is every time you shift. It helps make the car feel like mine, you know?
Blairstons 12
Dashboard, the mileage is wrong, and you can see I zero out the counter showing it doesn't work. One of the only things that doesn't work for real on the car.
Blairstons 13
To prove it's a manual, here's 3 pedals. I had to learn to drive it.
Blairstons 14
This pasta noodle is the engine.
  So, I have a new place with guys I know, and the rent is a whole bunch cheaper. I had to acquire furniture since this is unfurnished, but all in all it's a much better situation. Let's take a look:
Blairstons 15
Leaving the parking lot, you can see the building I live in. I'm around back, and you can see the path. Notice the fenced area on the right? That's the Pit of Despair, you'll see more of it later.
Blairstons 16
The path, those are the stairs up to my apt at the end. The Pit is to the left now.
Blairstons 17
So, this is our very own Pit of Despair. It's a 30 by 30 foot pit at about 5 feet deep. Maybe a drainage runoff, maybe they planned a swimming pool or something, but now all that's there is despair. We want to put a trampoline or a pirate ship there or something, I'll keep you posted.
Blairstons 18
Here's the bike I built, made from the parts of 9 broken bikes.
Blairstons 19
Looking up to the front door.
Blairstons 20
Here's the view once you get inside, with Bret sitting in front of the TV. His giant TV.
Blairstons 21
Just to the right of the entrance, there's also a fireplace and the door to my room back to the right. Ryan's futon is there in front, so is his extra monitor. The inflatable chair Meg gave me is there, but slowly deflating. Also, you can see the wireless router and cable modem up on the wall, away from anything that will block the signal.
Blairstons 22
More of the living room and entertainment center. You can also see the Baron's tank, he can see outside and watch TV, plus behind the recliner is the door to the patio. The guys kind of handed it over to me for workspace.
Blairstons 23
Looking out onto the patio, I made that workbench for $20, and it's solid as a rock.
Blairstons 24
Spare wood and bike parts.
Blairstons 25
Better view of the work bench, I like it a lot, plus a bunch of our collective tools, and my welding torch.
Blairstons 26
Back inside, the entertainment center. HD 37 inch plasma, 7.1 surround sound stereo, DVD player, HD TV with DVR and On Demand, plus an Xbox, PS2, PS1, Atari 2600, Nintendo, Super Nintendo, Nintendo 64, Nintendo Gamecube with Advance and Game Boy Color Player, Original Game Boy, Game Boy Pocket, Virtual Boy, Dreamcast, and finally we will soon get a Wii.
Blairstons 27
You can see the kitchen and the eating area, and the way back to the boy's bedroom. There's also the white stackers that make up our makeshift pantry.
Blairstons 28
View of the kitchen and the laundry room, not that glorious.
Blairstons 29
Ryan's turtle in the corner, it's a girl and about half the size of the Baron, but she's happy.
Blairstons 30
Here's the back hallway that leads to the boy's bedroom and to their bathroom, and our storage closet.
Blairstons 31
The Hallway.
Blairstons 32
Here's our storage closet, with all its junk. Maybe it could have been a pantry in a former life, but not now.
Blairstons 33
Here's the view of behind the futon, of the entrance door and to my room. And the fireplace, and our back 2 speakers.
Blairstons 34
Here's the way into my room.
Blairstons 35
The back of the entrance door, and the way into my bathroom.
Blairstons 36
The bathroom, my organizational thing, and some of my in room entertainment center.
Blairstons 37
Entertainment.
Blairstons 38
My closet, the start of the dresser.
Blairstons 39
My walk in closet, where my guitars are and stuff.
Blairstons 40
My dresser which we re did, and the window where I keep my books on the sill. Also, the start of my HUGE BED!
Blairstons 41
My lamp and bed.
Blairstons 42
Bed, underbed storage, nightstand, and chair.
Blairstons 43
DESK and ALL COMPUTERS!
Blairstons 44
Supercomputer and entrance door.
Blairstons 45
My bathroom, I just fixed the second towel rack. Also, my sink.
Blairstons 46
The behind the toilet thing, and the toilet.
Blairstons 47
The shower. Wow.
Blairstons 48
Finally, an analysis of my bed. I first got a bed for $70 from some international students, but it was nothing more than a 4 inch foam pad, I got ripped off. So when another queen sized bed came available, I got that for $30. I threw away the original box spring, used the original frame, put the new box on, put the new mattress on, then the foam pad, then the egg crate, then the pillow top, then the fitted sheet, with a stack of straps to keep it all together. All in all, it's the most comfortable bed ever made.

- - - - - - - - - - - - - - - - - - - - - - - - - - - - - - - - - - - - - - - - - - - - - - - - - - - - - - - - - - - - - - - - - - - - - - - - - - - - - - - - - - - - - - - - - - - - - - - - - - - - - - - - - - - -